Steve's GKD Legend

Steve's GKD Legend
Still, On the road again!

Search This Blog

Monday, 25 April 2011

Easter Weekend

Not a great deal happening with the car as I concentrated on getting the exit sorted out, I should say on the way to getting sorted as it's not a days project. I started digging holes for the metal posts, 11 in all which will then support "byggtimmer" what ever that is in English, like construction wood for fencing. The holes should go down below the freezing level which in this region is 1 meter, then cemented in place.
The metal posts are T-shaped so the beams are held in place behind the cross of the T.

The pipe is from the gutter pipes, I just need to sink it further in the ground before the 0-30mm stones are placed over the whole area.

I did manage to get something done on the car:

The second sensor arrived from BMW, not too bad for £50 new. I could have bought a second hand one through ebay but it's quite a delicate item and the last one sent in the mail was broken on arrival. I was a bit worried about the tank vibrating so I cut up a bike inner tube and put the lower tank supports through it. I'll do the same with the front support.

New fuel sensor, I also had to order the cable connectors.

Lower tank support bracket, makes a slightly tighter fit and perhaps less vibration.

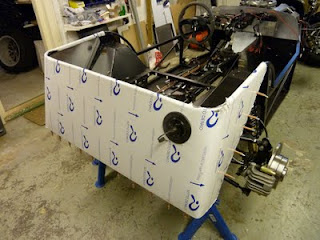
It was then onto one of the jobs I've been avoiding, bending the rear panel around the chassis tubing. I tried a few times using clamps but gave up as the damn things kept slipping off. I made up wooden blocks  which I then tried to clamp but they failed too - a few blue words filling the cellar! Then I bought a 1m 20cm long clamp which stretched from one side of the car to the other so it sorted both sides at once. I then used the 1m clamps I already had to pull in the rear of the panel.
Obviously it's good to use wood to get a nice straight edge which supports the panel on the outside and stops it deforming during the bending process.

I was told the bending the complete panel would take all day but I think it was slightly shortened using the extra long clamps. I'm pretty happy with the drivers side but I may have rushed the passenger side a bit as it is slightly deformed around the edges. I intend to get the car painted sometime after it's finished so I'll have the opportunity to fix problems like this.
I won't get the panel off again so I just hope I haven't forgotten anything!

Rear panel in place, next job get the rivets put in, tank connected, fuel filler installed.

Sunday, 17 April 2011

The great escape begins!

I arranged the digger, found someone who wanted the soil and borrowed a dump truck from work to transport it. By the time Saturday had finished 6 loads had been moved to someone elses garden. I hope the calculations are correct and I can actually get the car out!
Freddie and I moved the wood!

I marked out the bit to be removed.

Not much left to do - yer right!

Scania G380 - I was worried about scratching the paintwork!

The next step is to put up supporting walls, I don't want the neighbours garden falling in on my car! I also have to get a layer of 0-30mm stones and then finish off with small pebbles.

I also managed to get a couple of things done on the car. Engine fan, quite a few double cable connectors and I also levelled the car as it was difficult  to see if anything else was straight.
Radiator fan installed

Installed the battery connector next to the coil pack (I still don't know what I connect to it or from it!)

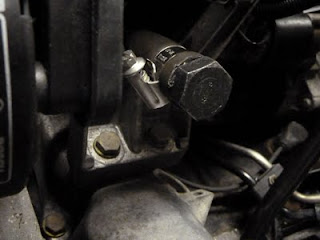
The side hose that needs to be cut and plugged. I hope this M16 bolt is going to work!

I placed the nose cone in position again, this time with the car and nose cone perfectly horizontal and there is large gap on the driver's side between it and the chassis, where as the passenger side fits nicely. 

If I push it down to remove the gap then the bottom of the nose cone is misaligned as well as the nose cone is no longer horizontal. What to do?

I'm hoping that my trip to the uk in two weeks will solve a lot of unanswered questions that are stopping any real progress. I want the car up and running within 5 weeks (that's when the garage door should be here and installed) so latest 22nd May - that's positive thinking for you!


Sunday, 10 April 2011

Spring is in the air!

The last of the snow has just about melted, I reckon it'll be gone by Wednesday, my youngest son Fredrik say Tuesday! Not so much time on the car this weekend as I had to fix the wooden decking which was crushed when the snow slid of the roof, then raking leaves and then started moving the wood pile which is in the way of getting the car out. I attached the radiator and pipes.
The toe out is really apparent
Pipes in place. I had to tap out the thread for the fan temp sensor as it as M8 and not M14

I'll get the fan attached to the front of the radiator once I get the attachments which were missing from the box! Then it was on to attaching the nose cone and headlight bar. The Dremmel with the small round barrel shaped sanding attachment was great for taking away fine areas of fiberglass.

I temporarily fitted the headlights and realised I'll need to change the glass as they are UK and not for left hand driving.

I placed the scuttle in place, attached the BOSS kit to my new steering wheel and put it in place in the car. I hardly have any vertical movement to adjust the steering column - I hope the SFRO people won't fail it on the view of  the instruments.
X marks the spot - I put this here to stop me cutting out the wrong side!

I got the second fuel sensor sent to me in the  post but unfortunately it was broken when I got it. I'll check with BMW how much a new one costs or get one from e-bay.
Seats and steering wheel temporarily in place.

Can someone help me here? The original place for the accelerator cable is the hole on the right going to the slot behind on the right. The bonnet won't clear it in this position so I was going to simply move it and use the hole and slot on the left and then cut the rest of the bracket away - sound okay? Also does anyone know where the hose marked with the white arrow goes?

Sunday, 3 April 2011

Great Weekend

It's been one of those weekends where nearly everything went well. Handbrake cables installed and only require adjustment once the brake fluid is running nicely through the pipes.
Two black cables running from left to right, adjustment made with the nuts on the left.

I was a little confused how they connected to the rear calipers but it seems they lie in the slot like this:
The black cable ends here with the metal end being squeezed in the caliper mount

Because this is a left hand drive, it's a bit of a squeeze with steering shaft, cable harness and brake/clutch fluid reservoir on the same side. Peter suggested I put spacers to lift out the reservoir so I did and at the same time I cut some chrome pipe, usually used for water piping. The extra long bolts I made up fitted nicely through them and even if I say it myself they look bl..dy good!
Brake and clutch pipes attach to the cylinders behind the pedals. The pipe going through bulk head is fake, it's not connected!

I'm pleased with the way the cables, battery etc have turned out. I made up a small bracket to keep the diagnostics plug in place and the coil is placed down beside the engine bolted to the bulkhead.
 
Coil can be seen standing up in the lower left.

The last few job of the weekend were to screw the ECU (looks a radio on its side), relays, battery cable holes through the bulkhead etc. There are loads of cables to connect but I don't have the spade connectors yet. Oh yes I connected the fuel lines to the engine so it won't be long before she can be fired up!
Gradually sorting out the spaghetti but it's well marked spaghetti!

Friday, 1 April 2011

Free Friday

All the new brake pipes are installed and even the new track rod ends which GKD Peter kindly sorted for me. They are a little longer than the others but SFRO will be happy they are not welded!
The old and the new

Next thing on the list was the propshaft. I removed the gear stick linkages to give more space to tighten up the 3 bolts for the adapter but specifically the 6 hex bolts keeping the propshaft to the adapter.

It's easier to put the 6 hex bolts in their respective holes before putting the propshaft in place.

Once the shaft was in place and tightened up I put back the gear stick linkages but then the lower linkage, shaped like a mini golf club(!) was tight up against the adapter so the shaft wouldn't move!


With help I found out the lower linkage can be installed in four different ways so it was a matter of just turning it around so the club part was towards the gear lever. 
The rear propshaft mount on to the diff.

Next job was to cut the hole in the side panel for the exhaust pipes. Attached the pipes and then marked on the frame where the hole should be. I had to remove and then screw them on three times to get the hole right. Nice that included in the kit is a polished aluminium surrounding which will cover up any small mistakes.
Exhaust and lambda sensor holes

The other job I have to remember to do is get the "exit" sorted out. There's about 5 cubic meters of fire wood to move first ...

... and then get someone to come and dig out about 35 cubic meters of soil; oh and then install a garage door. I've got the next few months covered!
It's going to be a tight fit out and around to the right.