Steve's GKD Legend

Steve's GKD Legend
Still, On the road again!

Search This Blog

Monday, 31 December 2012

Finally time to strip

I gave up waiting for the snow to melt and started removing parts. Started at the rear to check the wiring.While there I noticed that fuel had spilled out of the filler pipe the times I filled up too much. It runs down the outside of the tank pipe and across the top of the tank. I tightened up the jubilee clips but perhaps it needs some sealant in between too.
I also lifted up the cables so if any fuel did spill across  the tank it wouldn't short circuit anything.
Checked all the bolts too.
Took out the seats and carpets and found small traces of rust around the seat bolt holes. I'll clean it up and spray some Hammerite around.
Took the windscreen off and found the scuttle paint had been marked in several places. I'll get Magnus to see if he can re-do it. 
I then removed the scuttle by first detaching the windscreen wiper motor, washer hose, heater ducting etc. I need to work with the instrument panel so it had to be removed too. I regret spraying so much expandable foam on it to keep it in place.
Here is the spaghetti. Will clean it up before it all goes back but the main goal is to find the speed limiter problem, fix the main beam warning light which is always on and also to get the brake fluid level warning light working. I really need to move the relay holder too as it's hidden away behind the wiring loom.  
First off was checking the brake fluid lamp. It comes on when the ignition is first turned on (self test). The 12v is there but the earth connection for the lamp doesn't go to the brake fluid switch. It seems to be a fault in the instrument panel between the lamp and the white dash connector. 

After a great turkey dinner on the 29th I managed to pick up a bad cold so now I'm sick, no enthusiasm for anything at  the moment!

Monday, 17 December 2012

White Christmas

I've been hoping that the snow would eventually melt, it usually does this time of year and then comes back again in January and February with a vengeance but no! It looks like I won't be going for drive for at least 2 to 3 months depending on whether I get winter tyres or not.
This was outside the cellar door on Friday evening. Towards the main road it's at least a meter high. It'll need more than winter tyres to get out.


I think I'm going to have to call it a day and start on my long list of "Things 2 Do" I'm actually looking forward, very much to tinkering again. In fact every time I go down to the cellar I'm thinking "Shall I start now or wait? Peter at GKD is in the process of putting the last bits of the Super Charger kit together. I really hope I'll get it over Christmas as I have two weeks off. I wanted to get that installed and working before I did anything else. It won't be easy testing it in a room 6m x 4m but I suppose if it starts and stops it's a good indication.
Quite a few things to do. They all have to be done by the beginning of May with the intention of driving over for, among other thing, the Stoneliegh kit cat show (5th & 6th). Yupp, I know that was the intention last year but this time I'll have a soft top over my head! 

Merry Christmas and a Happy New Year! 

Sunday, 2 December 2012

Winter drawers on!

I couldn't resist going for a quick spin this morning. It was minus 8.5oC but with a few extra clothes it was actually fantastic to be at one with the elements (literally!) I'm seriously considering getting a set of winter tyres for early spring when the skies are clear and the sun is usually shining.
Not totally road legal. Winter tyres are compulsory from the 1st of December. I actually drove to the car wash to get the car ready for the winter jobs I have in store for it.

Thursday, 1 November 2012

Call the Cops

Decided to do a little upgrade as the weather hasn't been good. I bought a Coil over plug kit from GKD. I first considered buying the parts separately and making up a plate and wiring harness myself but in the end I was glad I bought the kit instead. The upgrade was done in about 10 minutes!

"Getting rid of the plug wires not only saves money, it also improves the durability of the ignition system. No high voltage wires means no voltage leaks and no misfires due to "bad" plug wires. Using individual coils for each spark plug also means the coils have more time between each firing. Increasing the "coil saturation" time (the time the voltage to the coil is on to build up its magnetic field) increases the coil output voltage at high rpm when misfire is most apt to occur under load."
The kit contains everything needed, very nice indeed. 
Before!
BMW cover removed and plug cables pulled to one side.
Plastic cable housing removed and two of the head retaining bolts removed. These will be replaced by the bolts retaining the COP plate. 
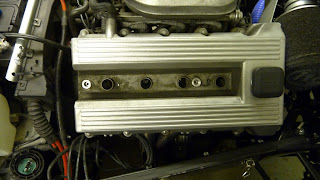
After! The plate containing the four cop packs and cable harness is simply pressed into place and bolted down with two hex bolts. The socket to the left that went to the ignition coil now goes directly to each of the coil packs. It would be nice to be able to use the BMW cover again but there is no way to keep it in place. Mind you, without it the cops still looks pretty cool!

I'll remove the old ignition coil (centre) and plug leads over the weekend.

I took the car for a spin today, literally! No, it wasn't that bad but the roads are quite damp so traction is pretty bad. One thing I did notice was the sound had changed since the cops were installed. Seemed to be a deeper, throatier sound. I'm not an expert but I presume the firing is cleaner, the fuel burnt more efficiently. 

I dropped into my favourite metal shop to have a chat with Kurt. Earlier on in the year I asked him if he could make me up a stainless steel grill to replace the black one. It looks great so far, no hurry I'll pick it up in the spring. 

We have had a couple of frosty mornings and even a light snow fall but I'm still hoping to drive a couple more times. I have to say that the soft top has been brilliant even down to +3 oC. No need to wear skiing hat, goggles and gloves any more. The only thing that is stopping me drive is the wet and icy roads.

Saturday, 22 September 2012

First track day

Actually it was a track evening at the Linköping Motorbana. About 2 hours drive south from Stockholm. 24 cars of varying types but mostly Porsche and BMW. The car performed really well apart from the rev limiter problem and too much pressure in the tyres. Someone at the track had their Seven (not racing) down to 0,9 bar. On acceleration and cornering it was equal to, or slightly better than the others but on the long 700m straight it only managed 160km/h (on the clock) so I was passed on several occasions!
The on-board gps recording 145km/h on one of the laps. I'm not sure how inaccurate the speedo is, 10% too fast at this speed maybe!
One time I managed to overshoot a 90% bend and locked up all the wheels in clouds of smoke! Spun another time and headed across the grass, stopping a few meters from the metal fencing. All that excitement was almost too much! Before next time though I need to sort out the limiter and tyres as well as install coil over plugs as well as get me some extra horsepower. I also need to sort out the correct driving line as I was pretty crap!
Giving the Porsches a run for their money - at least to the overtaking straight!

Friday, 21 September 2012

I've finally got it covered!

It took a while, a year to be exact but I had booked a track day last week so had to get it finished because of uncertain weather. I redesigned the soft top bracket to have it bolted to the roll bar with two M6 bolts. This way it won't revolve. 
The back of the bracket will bend to follow the curvature of the roll bar. Now it seems to work I'll make up a couple of nice polished ones.
When the top is not on the two supports fold back and rest on the rear panel. To allow this there's a 15mm spacer between the support and bracket to lift the support away from the bracket as well as the roll bar. It's made out of 10mm chromed water pipe. 
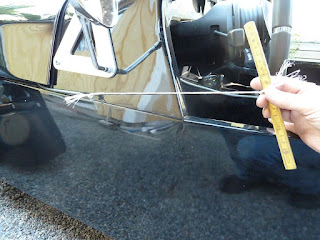
This is the correct position. I put wire between the two supports until I got them the right distance apart. The intended ribbon to the left will replace the wire for a much neater solution.
Once the soft top is "popped" on to the windscreen it's then dragged back over the supports. It's a really tight fit. I put the first rivet in the middle 25mm from the top edge of the rear panel and the others at approx. 150mm intervals around the rear edge also 25mm from the top. 

I ran out of press fasteners hence the long gap along the sides.Important to keep it really tight all the way around.
At last it's in place. No time to test it before tomorrows track racing!
It's not quite as good looking from the front as it is without the top but it's practical! Evaluation? It's really brilliant; now I can drive any day, any weather. The heat produced by the heater actually stays in the car! It's really extended the season. I may be limited when it comes to snow and sub zero temperatures though!  
Looks great from the side. I've even had dogs looking as I drive past!
The doors fit nicely between seams in the roof making a nice seal.
It's quite quick to take off too, just a couple of minutes.


Sunday, 9 September 2012

Rev limiter problems still

I was hoping that by replacing the MAF and now the cam shaft sensor my rev limit problems would be solved but alas they weren't. I then replaced the diff speed sensor and really thought that was it, I'd solved it.
One handed jumpy video!

It revved perfectly up to 6,500 in every gear up until the normal rev limiter actually came in. BUT then after switching the ignition off it was back to 5,200 again. I then had the engine idling, pulled the diff sensor plug off for a few seconds and then plugged it back on again: Rev limit was back to 6,500 again! As you can see both the odometer and rev counters appear perfectly normal. 

Peter suggested that I go through all the wiring to double check it's all okay. This will mean taking off the scuttle which I think I'll wait with until after a Scania race day which I have booked for the 19th of September down in Linköping. I can always unplug the diff sensor to reset it!

Sunday, 2 September 2012

Well that was a short summer!

The sun hasn't shone quite as often as most of us would like this year, in Sweden at least. It's been a case of "make the most of it" which I must say I have when it comes to getting out in the car. 

Joined motorcycles in this years Mälaren Runt which takes place every year in August. Thousands of bikes take part in a 300km tour around Lake Mälaren to the west of Stockholm. 
The start in Solna ("borrowed" picture!). Most of the towns along the way were lined with waving pic-nickers.
Everyone a die hard motorcyclist but luckily they didn't mind Neil and I in a kit car!

Over the past few weeks there has been quite a bit of rain so I've been very careful to pick the right days to go out. I therefore thought it was time to lengthen the season and attempt the soft top. I fixed the doors on some time ago:
This shows the first time I put the doors on but Peter soon told me that I had the hinges and doors on wrong. You may also notice that the mirror in this position can't be seen from the driver's side so will have to be moved.
Hinges now on correctly but there's a gap in the upper hinge that shouldn't be there, apart from that the doors are great.
The mirror is now moved further up the window bracket. The bolt fits nicely between the bracket and scuttle.

 Now it was time for the soft top. I couldn't use the bracket included in the kit (the one to the left) as there was no space for it between the roll bar and side panel.
This is my first prototype bracket I cut from 2mm sheet that's fixed to the roll bar with a M6 bolt. The centre of the circle mirrors where the pivot point is for the frame that support the soft top. I noticed a problem straight away, it's actually better to fix the bracket on with two bolts otherwise it may rotate with the force of the soft top. That's easily fixed - I'll make another with place for two vertical bolts.
Checking to see how it all goes together. It's okay I know the frame goes on the inside!

I had to remove the glass from the frame to be able to drill and rivet the pop fasteners in place. They are shorter rivets which fit between the frame and glass. 
It'll look something like this. I need to get the frame in place first before riveting the rear panel and then finally  putting pop fasteners in the rear of the soft top.

That's as far as I got with the soft top as I talked with Peter Friday about the rev limiter problem. I mentioned that when BMW gave me a free diagnostic they had told me the cam sensor was reporting an error. I bought one on e-bay a few months ago but never replaced it. Well he persuaded me to change it which I did today.  
Removing the old sensor was much easier than I thought, took about an hour. Removed air filter, the 5 upper inlet manifold nuts and bolts to get to the old sensor plug. Once off it was a case of re-routed the new sensor,  plugging it back on and replacing everything in reverse order.
Take care not to break the plastic cable holder. 

Thought I'd fixed it as it ran beautifully up to 6500 but then it was back to 5500. But ... 

I checked the diagnostics and the cam sensor warning had gone and it now showed P0500 "Vehicle Speed sensor A". I'll replace it next week and hope the error goes as well as the rev limiter problem!

Saturday, 28 July 2012

Road trip - Norway or bust

I managed to get the side screens fixed in place but didn't have time to get the soft top on but it was time for a little relaxation anyway. Neil and his son Daniel were up for a nice long road trip so we decided to head for Lillehammer in Norway the site for the 94 winter Olympics. Neil took his Suzuki Bandit and Dan kept me company in the kit. Weather was pretty good but there was rain forecast for the journey home. With the side screens in place the wind turbulence in the cockpit was reduced remarkably, the only slight problem was the side pressure pushing in the screens. At 80mph the pressure was quite significant which didn't make things easy for my "frozen" shoulder so occasionally I had to lean towards the passenger side.
Very hot day but no helmet or leather gear required - for us in the car at least :-)

Left home at 2pm Wednesday, picked up Dan in Borlänge and drove until 10pm which took us inside the border of Norway about 320 miles in total. Weather was great all the way. 
Wasn't really sure if it was going to rain during the night. If you look closely at the exhaust, side panel and rear wing you can see the results of hitting a fresh cow pat at 80k's. Good job we had the side screens on - there's mud in yer eye!
Lillehammer - reached by Thursday lunchtime. Walked up to the top, took a couple of photos and then walked down again - mission accomplished!
They can fix anything these days.
Then came the rain. We got some funny looks but with the side screens on the rain just blew over the top and left us quite dry. I need to put some sealant between the scuttle and side panels as water leaked in slightly.

Another night, this time in tents and I would say that it topped my all time list of worse experiences ever - bloody cold! Actually Norway was extremely expensive, camping, food, drink. Don't you want tourists Norway??

We were happy to get back to Sweden and headed for Sälen where the clouds cleared, the sun shone and the prices are reasonable. The roads around the Swedish Fjällen (mountains), ski resort country are absolutely fantastic. Beautiful forest roads in great condition, hardly any traffic and curves you wouldn't believe. I can highly recommend a road trip up there as even the accommodation at the ski resorts is cheap this time of year. 
Back into Sweden, and the ski resort Tandådalen

After a great night at the Ski Lodge in Lindvallen where we drank beer in the bar and watched the opening ceremony of the OS while a duo (John Mitchell & Ann-Sofie Jonsson) played Scottish, Irish and Swedish folk music it was time for final drive home.
Last song "Whiskey in a jar"

I have to mention that the car performed brilliantly. It took us safely 900 miles to Lillehammer and back in three days without a hitch. I still can't believe the fuel consumption and how many miles to the tank it does. Even driving at a constant 80 mph it still managed about 36 miles per gallon (8litres/100km) and easily 260 miles (420km) per tank. Well done GKD and Peter for an immensely fun car to build, to drive, to own as well as being comfortable, economical and above all safe. 


Saturday, 23 June 2012

Mid summer


Amazingly enough we are already half way through the year. The longest day was yesterday but temperatures have been struggling to get over 20oC. I have been limited by not having a roof on the car but hopefully that will change this coming week. I'll be seeing Peter at GKD on Monday, he says he has a set of prototype side doors that I can take home and try. At the moment I'm using a sheet of tarpaulin that I throw over at the first sign of rain. The main problem with rain are the seats and carpets.

Trosa Veteran Car Club 

During the summer there are two villages close to where I live that take it in turns to have enthusiast meets. Last Thursday it was down in Trosa a small picturesque coastal town 50km south of Stockholm. There must have been 50 or 60 cars of various types on display. Mine was amongst them and I was amazed how much attention it got.

4.5 litre Mercury from the 50's
The other village is Nynäshamn which I will try over the summer holidays.


When I had the panels painted I was a little disappointed with the results of the bonnet. Dan at Danbo Lak tried very hard to get the powder coat to look good and it did, fantastic in fact but something didn't quite work out with the bonnet, it had a slite orange peel finish. I talked to Mats who painted the fiber glass parts and he said he would go over the bonnet again with spray and then bake it. The result is brilliant - a mirror finish that really makes the whole car shine.


I bought some brilliant polish from BMW. So easy to use and rub to a mirror finish as it leaves no dust.

Some small jobs done. Anette finished the gear knob gaiter which now looks really great.
New material glued to the original surround.
Perhaps I should get her to make a new handbrake gaiter for me too!
Installed a bonnet switch
Out with Neil a few weeks ago the accelerator cable snapped at the pedal. This was the "Bear Grylls" solution until I got it home.

Tried a prototype wind deflector but it was useless. I found a link to site that made Perspex ones, may copy the idea.

I still need to sort out the speed sensor. A quick way to reset it is to plug out and in the sensor in the diff. I'll fix it when rain stops play as I need to get the scuttle off.  I can't afford to waste any sunny days!


That's all for now - have a great summer!