Steve's GKD Legend

Steve's GKD Legend
Still, On the road again!

Search This Blog

Sunday 28 April 2013

Test Drive before UK

I replaced the diff bolt with the high tensile 13,9 version which was 80mm in length instead of the 70mm used before. That way I could lock it off with a nyloc nut. Hopefully it won't happen again. 

Just to be on the safe side I decided to do a test drive yesterday. The family have a summer house about 300 km  south of here so I drove down bright and early. The trip down went very well, kept under 4000 revs, roughly 80 mph. One thing I did notice on the way down was that it started coughing just before the fuel gauge reached the red. A bit worried to start with, thinking it was something with the new engine configuration. Then I realised I had changed the fuel pump and it obviously didn't reach down in the tank as far as the old one. Managed to get to a garage and filled up with the new recommended Shell V-Power. Another thing I noticed was the fuel consumption at 80 mph was a lot worse than before, but hopefully it will be sorted out by Peter next week.
At 6 am it was quite nice, a bit cold but then went through ten minutes of rain but it blew over the top.
Further south the sun came out but it was still a  bit chilly with the top off.

Once down in Vimmerby spend the day with the rest of the gang cleaning up the garden and getting the house ready for spring. On the way home felt quite a lot of vibration in the rear off-side wheel. Couldn't see anything wrong and assumed it could be balance weights that had dropped off. Checking everywhere else I noticed the front near side wheel was a bit lose and found the hub nut a turn undone! The edges of the nut had not been pushed in to stop rotation! Long story short the vibration turned out to be the hub bearing. Strange really as I only put them in 2 years ago. I wonder if I put them in wrongly! Anyway will have to buy new ones tomorrow.
This is the little bugger I'll have to change again. I remember it wasn't that easy to press in or out bearings. At £60 one doesn't want to press them in incorrectly (I did that once before and there's no second chance!).

The fuel pump I removed and lowered it's position in the holder so hopefully it'll reach to most of the fuel in the tank. I'll try and get out on Wednesday for a long drive and see.

Also it was quite a cold evening and although the heater was on full blast there was a cold draft coming through the aluminium bulk head which basically killed off any heat being produced. I turned off all the lights in the cellar and had a working light in the foot wells. It was amazing how much light could be seen in the engine compartment. Blocked some of the unused bolt holes with bolts and used some kind of thick blanket underlay for the larger holes e.g. steering column and main wiring loom.
Wrapped around and pushed slightly into the holes and held in place by wire ties. Afterwards most of the light had gone.

Hopefully once the bearing is done, and a check of the other bolts done again we'll be ready for Thursdays long trip. I'll make sure I have a full tool kit just in case.

.... Bought a couple of new bearings from BMW, 600SEK each. Used the press at work again to remove the hub and press in the new bearing.
This is how it looks when the hub is pressed out, it leaves half the bearing behind. It's only to remove the locking ring and press out the rest of the bearing.
Heated up the hub and used a puller to drag off the remains of the bearing.
The new bearing ready to be pressed in. Make sure it goes in straight and even.
Last time it was quite difficult to get the locking ring in place so I may have over done it by pressing the bearing in too far. This time I took it really easy. Now the ring is in place the hub can be pressed in.
When pressing in the hub support it underneath or you'll push out the centre of the bearing which will mean you'll have to start all over again with a new bearing!
The final press. Once in the hub nut will keep it in place.

Put it all back and luckily it worked fine.Another thing that broke was the accelerator cable where it joins the pedal. This is the second time it's happened, even happened on Richards car so needs a little thought to improve  the design.


Thursday 25 April 2013

Soon England or bust

It's bit a bit of a rush to get the last minute jobs finished for the trip next Thursday. Last night I thought everything was ready, dash and dials, windscreen wipers and soft top back on, even managed to get the console finished although I'm not completely happy with it. Today was going to be the first Scania Road trip; out in the evening after work with other enthusiasts. The day started and finished with brilliant sunshine, a perfect day for a country outing in the Legend. On the way to work however the bolt holding the front of the diff to the frame bracket actually snapped half way along the thread leaving me with a tow home.
It was too late to get a new bolt (M12 70mm 1,5mm pitch) so will pick a couple up tomorrow morning. 

I tried to improve the air flow to the MAF as  it was tucked next to the battery with hardly any air getting to it. I ended up buying a tube and in-line filter and routed it down to a 45% pipe under the car. It really needs a log thin intake to scoop in as much air as possible but this will hopefully do for the time being.
It's a but tight with water bottle, battery etc but quite a neat solution from "Biltema" (some things they sell are good!)

It's very close to the exhaust manifold but hopefully not too close.

The console is okay but the 5mm foam I used was too thick, could have been 2mm or no foam at all. Also the heater control and reverse sensor display don't look good. Actually I could probably leave the heater in the ON position and hide the control behind, same as the reverse sensor, it's enough to have the beeping without the distance display.
I have a switch for turning on the ODB II connector, one for testing and showing if the oil level is too low and one to turn on an LED lamp in the passenger foot well.
Added a 12v outlet between the seats and also a dual USB on the side of  the console.

Checking around the internet a few weeks ago and stumbled on an air jack that runs on compressed air that a Chinese company were advertising. After a bit of negotiating the price including postage was pretty reasonable. Paid with Paypal! Two arrived (One for Neil) in just over a week with FedEx. I can honestly say it's brilliant! The max load is approx. 3000kg, so lifting up the kit car is a piece of cake and it's done in about 10 seconds.  
One just wheels it along, push it under the car so the three air bags are under something reasonably solid. The minimum height can be about 13,5cm and the Legend is about 17 at it's lowest point so there's no problem getting it underneath.  It's then just a matter of pressing the inflate button.
The max height is about 45 cm which is plenty to do most jobs. The main one is having  to change the tires on two cars twice a year!

I can get the wheel off and back on in a matter of minutes. To lower the car one simply pressed the deflate button and the car slowly drops down. The final air is sucked out by pressing another button. just like the wheel nut remover it's a brilliant tool and well worth getting!


Thursday 18 April 2013

Dyno not so good

Monday it was time for the dyno test at Turbo Center. The forecast the week before was for sunshine and clear skies but ... Luckily I only had to drive 6km in drizzle but still not fun. If I had the windscreen on at least I could have driven fast enough for the rain to blow over. Then I had to wait out in the rain as the place was full up with other cars. But anyway eventually the tests started but to cut a long story short, it didn't go well. Basically there was an issue with fuel pressure. Trouble was they had no experience with the rising rate fuel regulator and suggested removing it, remapping, changing injectors etc. Talking to Peter we decided to adjust it once I get over to Maidstone in a couple of weeks.
Got to around 164 HP at the wheels before they decided to stop the test
A real pity I didn't find out the cars real potential, will have to wait until England. To make things worse it rained harder on the way home!

Decided to get on with a few miscellaneous jobs. I attached the rear boot hood using the same attachment points I have for the soft top. It's a really neat solution GKD has come up with. 
Just like the rear carpet it fits snugly around the roll bar.
Fits nice and tightly.
The only small issue is that there is no attachment at the front, so it could flap around or rain could eventually gather and roll into the car. I'm going to put holes every ten centimetres or so along the edge of the cover and then corkscrew an elastic rope round the roll bar. That way there is a slight slope towards the rear.
It looks so good I'll leave it in place unless I have the soft top on.
The fasteners that came with the rear carpet didn't hold very long so I bought a different type from Carhoods on E-bay HERE

Another job was holding the battery in place. I bought the Red Top 25 battery box but there was no room for it. Ended up with a type of motorcycle solution. 
The rubber ring bolts to the base of the aluminium bulk head with the other end stretched up and over a plastic ring I bolted to a home made bracket. As you can see the air filter isn't in a good place, hardly any cold air getting to it. That's another challenge to solve.

Sunday 7 April 2013

Getting on with odd jobs

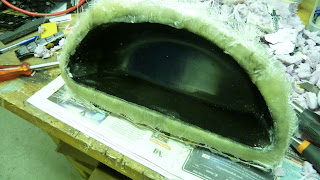
After yesterdays very successful test drive the weather turned a little cold so it was time for some inside jobs. Mats is coming around tomorrow to take the scuttle away for re-touching so I needed to fibreglass the glove box in place. It took ages to finish the plug and then it was time for the fun stuff to start. I bought some black gelcoat and painted the whole thing, except the intended opening with a layer.
I was quite liberal with the gelcoat.
When tacky I covered it in a layer or two of fibre weave and then two or so of fibre matting. It was actually difficult to keep up with where I had put the fibreglass but I thought it was fairly even.  
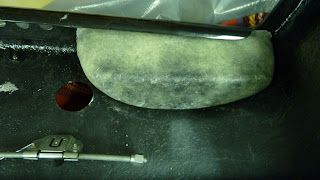
When laying on the fibreglass I made a lip all the way round to help attach it to the scuttle. Left for 24 hours it was time to get the plug out which was actually easier said than done. In the end I dug it out with a screwdriver so it was completely destroyed. It better be okay!
I was quite happy with the result but noticed I'd left a small bubble of air in one corner so the gelcoat fell through. No harm done I'll touch it up later-
One major thing that was wrong was the size of  the glovebox,  it was a little too big, so will be a bit of a tight fit.
First cut into the scuttle. I didn't want to take off too much. The idea is to attach a door and locking latch so it requires room for hinges (that's a later stage)
Ended up Dremmeling a little more off as the opening was a tad small.
I sanded the inside of the scuttle where the join would be and then put on a layer or so of fibreglass as far as I could reach. It wasn't possible to reach the top left hand edge. Maybe I can put something on the inside.

It really had to finish the console so got hold of a sheet of 1.5mm aluminium sheet instead of the stainless steel, so much easier to work with. The two large holes are for the heater outlets and the smaller one is a USB power outlet. 
Drilled holes and pressed in place three M4 rivnuts. Rivnuts are a really nice solution for this.  
On the front of the console I put 5mm foam which I will use on the sides too. It'll give the console a nicer feel once  the black synthetic leather sheet goes over the top. The sides overhang the engine tunnel so I'll rivnut it in place. I'm not sure how the carpet fill fit around it but I'll worry about that later.

Friday 5 April 2013

A breath of fresh air

I'm deliberating whether to use a bonnet scoop, side vents or forced induction from under the front somewhere to get enough air to the filter. The scoop looks great but a bit mean. I'd rather it looked subtle.
There's something under there, I wonder what it is!
Plain, discreet and a little more refined but will there be enough air coming in!

What do you think?

Update ...

Neil and I went for a drive this afternoon, temperature was hovering about 5 oC and we had no windscreen so it was a bit bloody cold. We headed for the motorway, bonnet was in place. It was almost pointless using 1st and 2nd gear as it was in the red the whole time. It seems that not enough air was available as it hesitated several times when I harsh accelerated. But still it's hard to describe, the power was endless. It was almost too difficult to drive because the cold wind was watering our eyes. Reached 100 mph in a flash and the wind without windscreen made it almost uncomfortable. The winter hat I had lent Neil was ripped off - I lose more hats that way!

Later I removed the bonnet and took another drive, the airflow was vastly improved. The acceleration was unbelievable. Before the modification it took ages to get to 100 mph; now it was up to 110 mph without blinking an eye. 

Acceleration at high speed seems to be much more noticeable that low.

Will try to record a little video tomorrow.

She flies!!