Steve's GKD Legend

Steve's GKD Legend
Still, On the road again!

Search This Blog

Tuesday, 1 May 2012

The final 100m of a marathon!

 It's been a tough week down in the cellar. I thought I was a day or so away from my first spin of the year but things took far longer. Monday I dropped off the front diff bracket at Huddinge Stål (metal) together with a quick sketch of a bit I wanted welding on. I picked up the rear panel and bonnet on Thursday, bolted and wired in the fog and reversing lights. Friday the diff bracket was ready and looks like this:
It allows two extra bolts to be bolted through the bracket and into the chassis bracket.

Here it is in place, the new bolt in the lower centre has a twin on the other side. I think this should make it quite strong, it stops it from lifting at the rear at least.

Neil came up again on Saturday and we riveted all the panels with nice black rivets. Bolted on the rear wings, diff mount, put the skuttle in place with ICL connectors and switches for headlights, heater etc. Felt very good to cross off so much from the list.
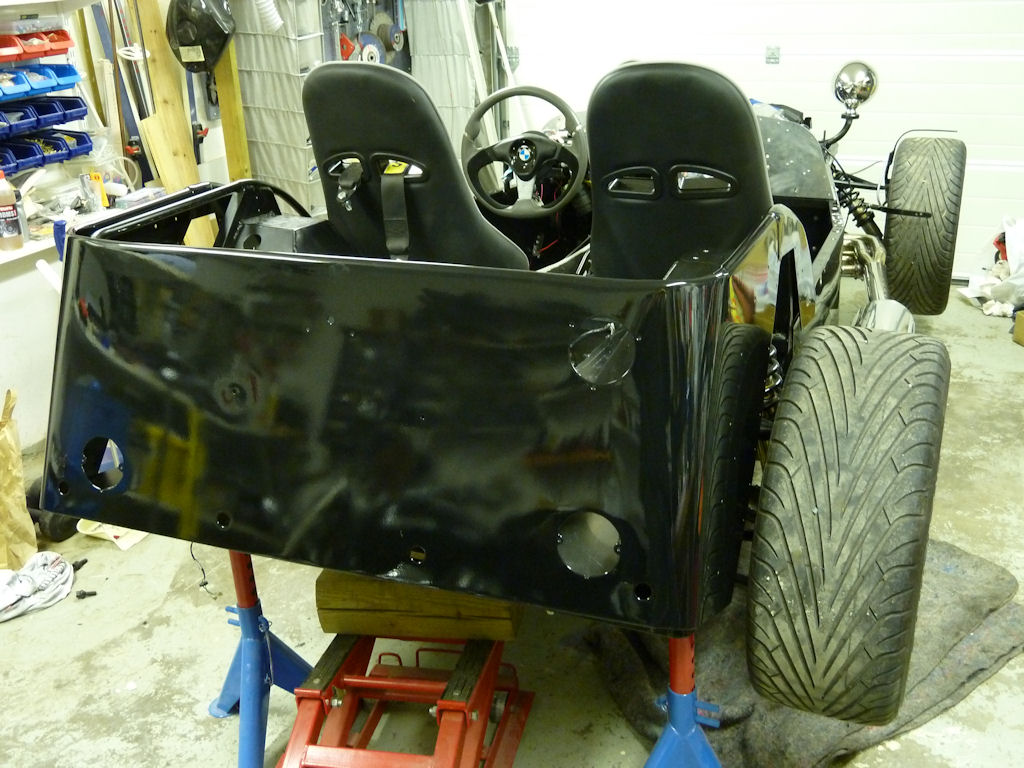
Rear panel temporarily in place just to check the side panels and welded join to the rear panel. Danbo Lak did a fantastic job of making the pigs ears I had done into silk purses! 

Rear LED lights in place. Nice thin ones from CBS in Staplehurst. A bit expensive but worth it,
Number plate and fuel filler pipe in place.
Time to get the tracking done. I used a Black & Decker DIY laser on the rear wheels and shone them towards the front. Then adjusted the track rods until the bar and light lined up. Also checked distance between front wheels,
The rear wing guards look great against the black. I used M3 (I think) oval headed Torx bolts instead of riveting the guards on. 24 each side. I added extra repeaters to the rear wings to match the front.
I wanted  the rear carpet to be easy to take out so I used poppers riveted in place. Trouble is when I tried to pop the carpet off again they fell apart basically. Will have to look for a better solution
Now it's officially a GKD. An emblem for the rear and one for the bonnet. I also have a nice silver "BMW inside" sticker than looks great against the black too. After a lot of cutting, sanding and messing around I finally got the wing lights bolted on. LED lights also from CBS cut to just 15 mm depth.

Status now: I had a quick drive up the road and back and everything was fine. Hopped in the car later intending to fill up with petrol and the engine wouldn't start. It fires and runs for a second or two and then stops. Even with the ignition key out I can hear the fuel pump running as well as something in the engine is sounding too. Turn the key to ignition position and the pump stops! If I wait a few minutes it fires up again. Peter suggested I check all the earths etc. which I will do tomorrow. It seems strange  that it worked earlier and all I have done is connect a few lights.


Sunday, 22 April 2012

Suddenly it's coming together again!


Picked up the side panels from Danbo Lak on Friday, they look terrific. The bonnet and rear panel will be ready next week sometime. Saturday Neil came round and we spent a few really constructive hours getting loads of jobs done. It almost got to the stage of taking it for a spin around the block. We got both side panels riveted on (made much easier using the new air riviter!), exhaust manifold, exhaust, seats and carpets in and bled the brakes. Oh and started up the engine and checked the new heater worked and that there were no leaks!

Getting the manifold pipes through the side panel without scratching the paintwork was a challenge.
The contrast of stainless steel and black is very nice.


Next job was to install the wiper motor rotors and tubing. They all had to be cut to length and flared to keep them in place. The hardest was the last section towards the motor as it bends down towards the motor and the motor has to bolt to the aluminium bulkhead. If the bend is too tight the spindle won't go through the tube.
The last small section is to take up the extra spindle when the wiper goes from stop to full wipe position. It's worth buying a good flaring tool (I love tools!)
Measuring the spindle movement. It was actually only about 3cm but I left about 8.
The dash in place with demister vents, wiper blade spindles and water jet. I'll have to move  the water bottle a centimeter or so as the wiper motor bolts catch the bottle brackets just at the wrong place.

Another job that I have to do is strengthen the front mounting plate for the Diff. James's bracket was  pulled from the frame during a drive. Peter at GKD has fixed this for all new chassis but in earlier ones this seems to be a weak point. To be on the safe side I'll get an extra plate welded to the bracket to allow two more bolts.
Bracket in the centre with two bolts. I'll see what I can sort out tomorrow.

Also managed to attach and adjust the handbrake cables. Next few jobs include getting the tracking done. I set them to vertical while the car was up on blocks but I have to set toe out on the front which I'll do while the car is down on the ground. I beleive this is usually set to 0 degrees but for racing 0.2 degrees is probably better. I'll set it to 0 for the time being. I found quite a good site that explains the different terms for wheel adjustment: http://www.familycar.com/alignment.htm


Sunday, 15 April 2012

Snow again but it didn't stop play!

Just when we thought it was safe to go out the snow came again. Friday night there was almost a blizzard and by Saturday morning there was about 7-10cm of it laying everywhere. It'll be gone in a couple of days though.

 
The big news is I got the nose cone and dash board back tonight and I must say I'm very happy with the results, if the panels look as good the car will look absolutely brilliant. Saturday and today I spent doing a few odds and ends. First one was to cut and temporarily fit the carpets especially on the one that covers the centre console.  
There was a lot of messing about cutting around the heater and hand brake, gear shift not finished yet. The result is not too bad although I still intend to make a console to cover the heater and to house the heater control, clock and 12v power outlet. I want the carpet to be fairly easy to take out if necessary.

I intended to use a chrome gear shift surround but in the end decided against it as it would have been a bugger to bolt in place and didn't look right without the hand brake also having a chrome surround. In the end I'll use the standard BMW surround and Anette will sew a longer leather gaiter for me as the standard is too short.
The chrome surround in position, a bit out of place with the grey edges carpet. To use the handbrake one has to be sitting backwards :-)

I didn't manage to finish all the jobs I set myself for this weekend but most of the jobs left are simply to bolt parts back on again.
  1. Fix and install carpets YES
  2. Fix gear shift and handbrake gaiters NEARLY FINISHED
  3. Put in safety belts and seats READY TO FIT AND BOLT IN PLACE
  4. Fix heater and fill radiator, fan wired in YES
  5. Install handbrake & bleed brakes YES/NO 
  6. Finish sanding rear LED lights NO
  7. Started making console YES
  8. Buffed the exhaust pipe(s) YES
  9. Finish soft top NO This is quite a big fiddly job and the rear panel and windscreen have to be in place. I'm hoping Peter at GKD will have  the  side windows ready in the next two weeks but I'm not holding out too much hope. I'll have to cut plastic covers instead as I have already had one bad experience with rain!
I need to leave the dash and nose cone to completely dry before I start attaching bits so probably leave them until Friday. I'm afraid of making any marks especially when installing the wiper motor shaft, ICL, switches etc.
The finish is fantastic, really pleased with the job that Mats did. His day time job is building and painting special order (S-Order) Scania trucks.
The nose cone will look great once the grill and indicators are bolted in place and then the GKD emblem placed front centre!

James managed to get his sump re-welded after cracking it on the English country roads. He's going to make a sump guard so hopefully will let me have the plans so I can sort one out before my UK trip.  

Sunday, 8 April 2012

I lost the bet!

Unfortunately neither the panels nor the fiberglass were ready to pick up. Danbolack who are painting the panels are very customer focused and were not happy with the type of paint they used as it didn't give the expected glossy finish. So they are going to do everything again. The guy painting the fiberglass is doing the job in his spare time so I can't push too much.

In the mean time I cleaned up the alarm wiring and have only the bonnet switch to wire in once I get  the bonnet back. Peter at GKD kindly helped me with the windscreen wiper motor and washer bottle wiring so everything works nicely with the original BMW wiper stalk.

Last year I bought an OBD II adapter with WIFI so I could read in the diagnostic codes from the engine on my I-phone. The trouble was it was on all the time even when the ignition was off and flattened the battery within a few days. I had a quick look inside the adapter plug that goes into the BMW diagnostic socket and discovered it was only a matter of moving the orange wire connected to pin 14 "battery power" to pin 16 which is "ignition 12v". Now it works great but the next problem is working out why I didn't get speed last time I had the engine running!
Very easy to open up the plug and solder the orange wire (power to the WIFI dongle) to pin 16 instead  (see http://pinoutsguide.com/CarElectronics/car_diag_pinout.shtml for details)

Diagnostic plug in place, nice with a little hi-tech

I needed to get the heater sorted out too so I bought some extra bits from CBS to help out. Not sure what to do with the carpet but will probably have to cut the bit off that usually covers the plate the heater is bolted too.
The cable is to adjust the temperature but until I get the console made it'll have to hang lose for the time being. I can't drill it into the plate as the gearbox is too close.
A hole for the 12v outlet and a quick spray of black paint.

Started on the carpets again by smearing GRP filler around the holes on the underside of the carpet I intend to cut out for gear shift, handbrake and other holes. Otherwise they will end up fraying.
I hope the filler works

Latest news: Fiberglass parts could be ready Sunday. Less than three weeks until my intended drive to the Stoneleigh kit car show so things have to start moving! 

List of things I can do before I get the panels & fibreglass parts back. It's quit short as so many parts depend on getting the panels back first:
  1. Fix and install carpets
  2. Fix gear shift and handbrake gaiters
  3. Put in safety belts and seats
  4. Fix heater and fill radiator
  5. Install handbrake & bleed brakes
  6. Finish sanding rear LED lights

Sunday, 25 March 2012

On the road by Easter? Place your bets!

Well, I didn't receive any phone call to tell me the panels were ready but I don't mind as I still have internal jobs to do that are much easier with the panels off,  like seats.

I had another go at making a bracket for resting the clutch foot. I bought a pedal set on one of my trips but because the pedals are so close together I couldn't use it. Instead I cut one of the pedal covers in half and bolted it to a bracket which I can slide up and down the frame rail for fine adjustment. 
On a long trip I used to get cramp in my foot as there was nowhere to rest it.

Another job was getting the LED lights sanded down, filled and sanded again. I had to get at least one done as tomorrow I'm handing over all the fiberglass parts to a chap at work who has a paintshop. I was using a wing as a sanding block to get the light to the right shape.
Cut down lamp casing, one more to go! I'll put a circle of rubber between the lamp and the wing. 
All the fiber bits ready for filling, sanding, painting and varnishing. I can't wait to get them back!

Drilled holes for the water heater pipes and connected them to the engine side. The battery fitted nicely over the top.

I hope the heater actually works after all this. The main problem is going to be demisting the windscreen.

Sunday, 18 March 2012

Sickness slows things down

Unfortunately picked up a cold last week which finally took its toll Friday afternoon. Even with a few pints of Jims homebrew to celebrate Saint Patricks day didn't get rid of it. Therefore the enthusiasm has been a bit low but still managed to fix a few things. I picked up the painted test piece from Danbo and  it looks really great. If the rest of the panels look like this I'll be extremely happy.
Hopefully all the panels will be ready by Friday

The longer brake pipes were also ready to pick up and £20 for both was a great price, plastic coated too! I put them in place along with the springs to limit the turning circle, plastic sleaving etc. Only the toe has to be adjusted now but that'll wait until I rivet the side panels on as I can't put the panels on while the shocks are in place and that may throw the steering out.
I went with the cut springs instead of the other alternatives even has the natural spring damping on full lock.
I'll put the disks and brakes back on later.

I tried a couple of solutions for the LED lights that will go on the rear wings (lights, stop lights and indicators) but they didn't look good at all. In the end I cut into the original lamp housing to reduce its thickness. 
I may reduce it even further but have to strengthen it.
Before cutting I used plastic padding to stick the screw tubes to the casing. Then put in a layer of plastic padding in the base. Later I'll shape the rear so it matches the rounded shape of wing.

Sunday, 11 March 2012

A bit of body and glass

Spring feels just around the corner so there's pressure to get the essentials finished at least before April arrives. I picked up the windscreen glass a week ago as well as the panels so I had a few things to keep me busy. I got the welding guy to cover up the holes from the old rear lights and then I marked and cut out the holes for the round LED fog and reverse lights. The lights are only 22mm deep with only about 10mm protruding out from the panel. Hopefully it will look okay as it's too late to go back now! 
The lights shouldn't effect the rear sensors. 

I asked to have the side panels welded to the rear, it looks okay, better than not welding and hopefully will look better when powder coated!
  
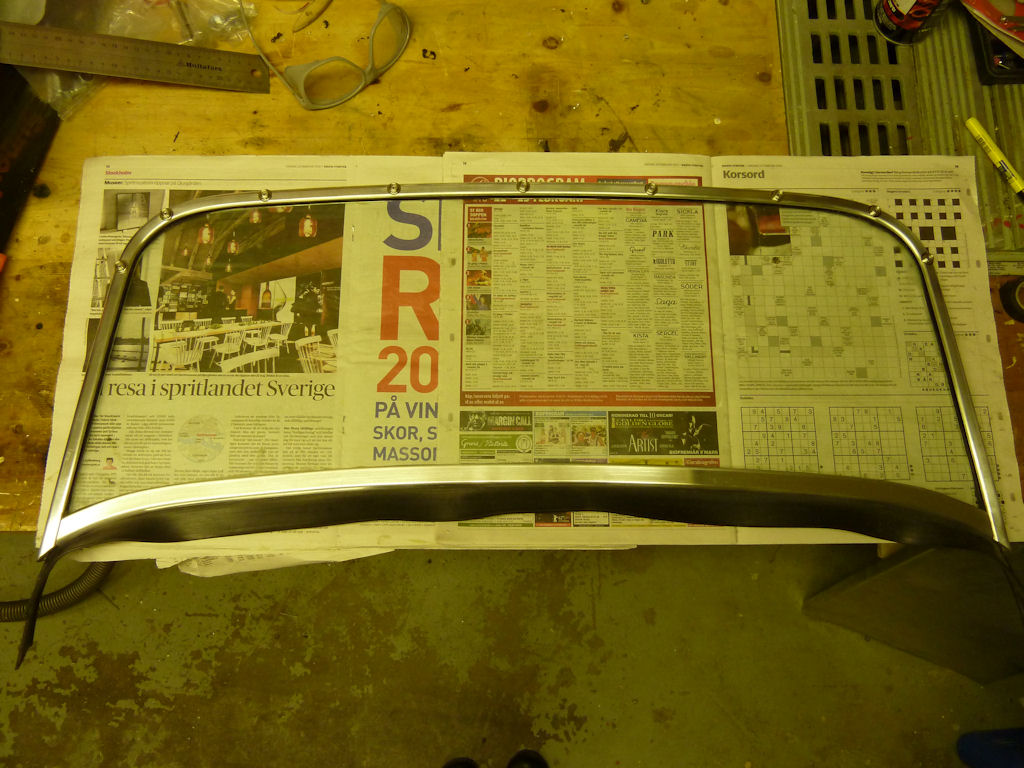
It was quick difficult to get hold of 5mm laminated glass so I ordered two to be on the safe side. They cost around £45 each so less than my insurance excess would be.
The edges were a little long for the side screws to go in so I took away a few millemeters with  the Dremmel.
Before the glass went in I drilled 3.2mm holes for the press studs for the soft top. Then put them in using short rivets, which means the glass can go in without hitting them.
Press studs in place as well as glass. Ready to go back on once the scuttle has been filled, sanded and painted.

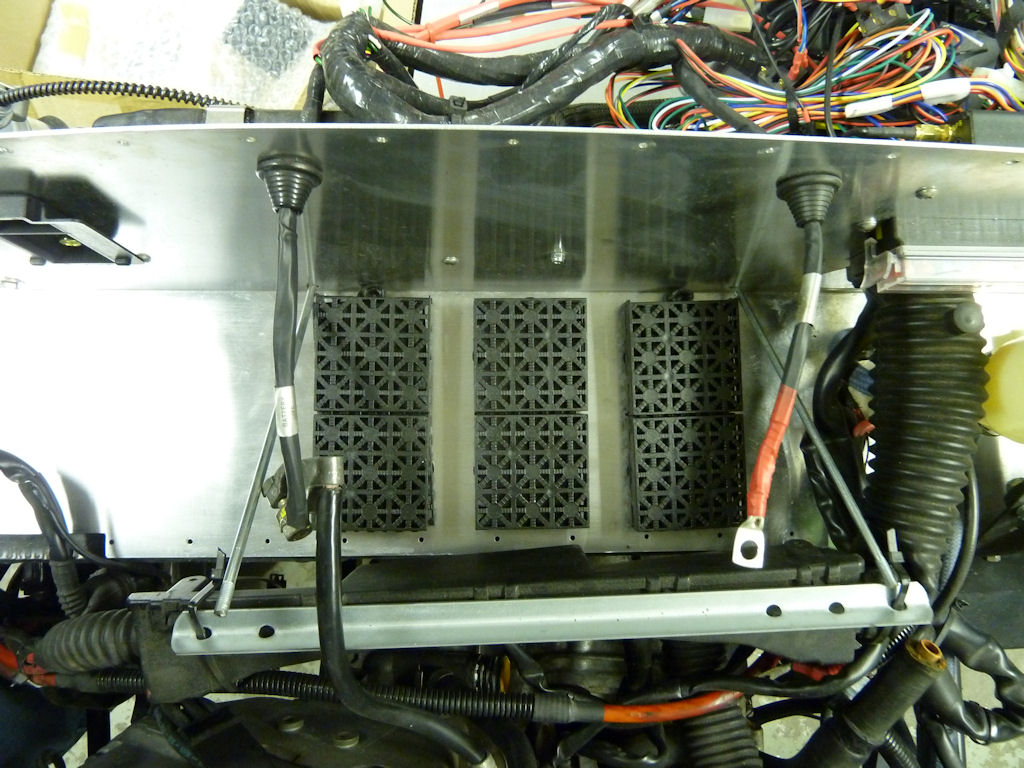
I wanted the heating pipes to go directly from the engine in/outlets under the battery, through the aluminium bulkhead and into the heater. Thought about making an alumium box to lift it but the had the idea of simply using one of those plastic floor tiles which are about 6mm thick to lift the battery up slightly. It's possible to cut them quit easily and stacking two should give enough space to get the water pipes under.  
The battery clamps should keep everything together nicely

Another small job but still very important is to find a way of attaching a clutch foot rest. I bought a readymade one from CBS but there is no way there is space enough for it. At the moment I've bolted on a jubilee clip just to get the position right and then maybe weld a small plate to it. That way I can always adjust it if necessary.

It can be seen bolted round the frame. Has anyone solved this problem?

Sunday, 26 February 2012

Wishbones done - again and more

It's been a good couple of days and a few things have been crossed off the to-do list. I wanted to check how good the lock to lock was on the steering after the new wishbones were installed. It's made a really big difference in fact I'll have to stop it going too far as the cycle wings will hit the body.
It was easier taking the headlights and radiator off to get to the upper spring mounts 
Upper and lower wishbones in place
To get the new upper spring mounts to fit flush with the old the edge had to be filed away and finished with a dab of "Hammerite" rust protection paint.
Spring mounts in place ready for the spring to fit in between.
With all the bits temporarily in place the turning circle is excellent. I won't have to do a 4 point turn to get out of the garage now!
Problem is, it's too good and the cycle wings will hit the side panels. I think I can cut the spacer/centralling springs in half to stop the wheels within about 5cm of the side panels.
The theory is I can cut these springs to 25mm (compressed) and put them back on again.

I'll set up the tracking as best I can and then get it professionally done. I'm happy that it's been quite a straightforward job and the improvement in steering will be very much worth it.

I also fixed a couple of small jobs that should have been picked up in the registration test. One was correctly fixing the ends of the hand brake cables and the other was a missing lock nut on the rear track rod.
Much safer with the bolt through it and squeezed in place.
Another job was to replace the small car trailer mud flaps. I found a large strip of 5mm hard rubber, that I cut to shape. It may be a little too big but it'll stop a lot of stones (probably even boulders!)

I'm looking forward to the coming week as the windscreen glass should be ready to pick up and hopefully the panels are also ready to pick up (they have been gone a long time!!)